Google Tag Supervisor (GTM) is an effective, complimentary tool supplied by Google that enables site owners and online marketers to handle and release marketing tags (bits of code or tracking pixels) on their site (or mobile app) without requiring any coding abilities.
To put it simply, it’s a tag management system that allows you to rapidly and quickly upgrade measurement codes and associated code pieces jointly referred to as tags on your site or mobile app.
Why would somebody wish to utilize Google Tag Supervisor?
GTM streamlines the procedure of tracking user interactions by offering an easy to use user interface to carry out tracking codes, all without the consistent requirement for a designer’s support. Whether you are seeking to track standard analytics, display particular occasions like kind submissions or clicks, or carry out more intricate remarketing projects, GTM can be a vital possession. It enables higher dexterity in the digital marketing world; you can evaluate and release tags without needing to count on the IT department to compose and launch code, making the whole procedure a lot more effective.
Furthermore, GTM supports a range of tags for various marketing platforms, not simply from Google’s suite of tools. This compatibility extends its energy as a central tool for handling a range of various marketing information streams. With the capability to include, modify, and disable tags at a minute’s notification, online marketers get a considerable quantity of control over their information collection and reporting procedures.
In a nutshell, for anybody seeking to enhance their website’s code and boost their marketing efforts with very little technical requirements, Google Tag Supervisor is an important tool.
Now, let’s stroll through how to set up Google Tag Supervisor on your website. It just takes 4 actions and you can be performed in about 10 minutes.
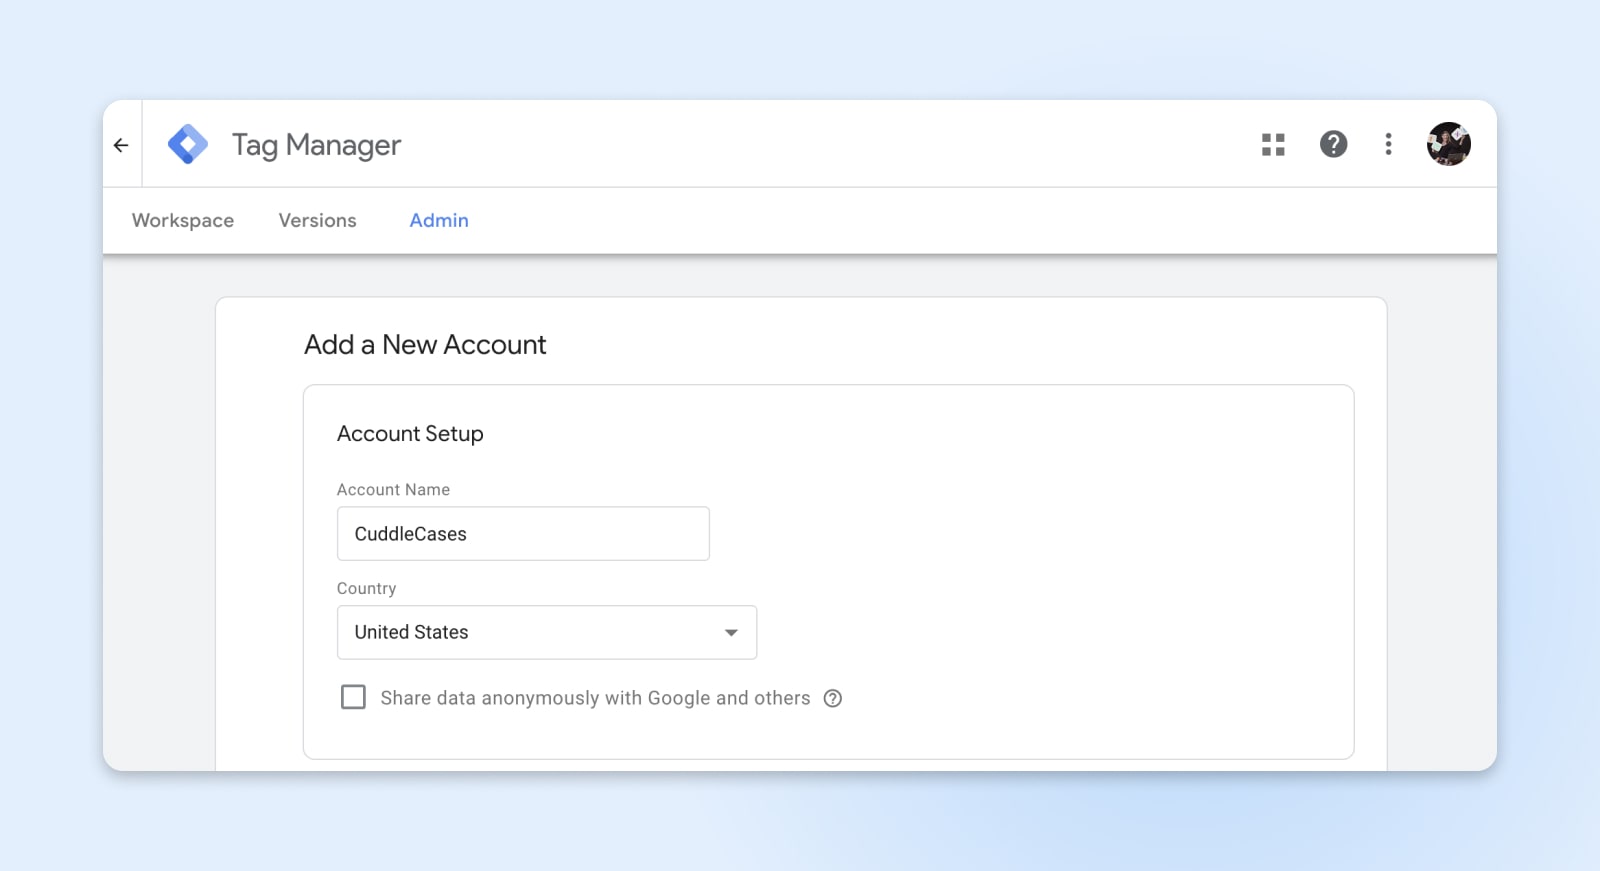
Action 1: Develop A Google Tag Supervisor Account
Beginning with Google Tag Supervisor is simple, and the primary step is to establish an account. If you currently have a Google represent services like Gmail, Google Drive, or Google Analytics, you can utilize the exact same account to check in to Google Tag Supervisor. If not, you’ll require to develop a brand-new Google account.
- Go to Google Tag Supervisor. Open your web internet browser and go to the Google Tag Supervisor site ( tagmanager.google.com). Here, you’ll be welcomed with the alternative to check in or develop an account.
- Check in or register. Click the “Check in” button if you have an existing Google account, or select “Develop account” if you require to make a brand-new one. Follow the on-screen triggers to check in or to develop your brand-new Google account.
- Develop your GTM account. As soon as checked in, you will be triggered to develop a brand-new GTM account. Click the “Develop Account” button situated in the leading right corner.
- Enter your account information. You will require to supply a name for your GTM account. Google suggests just having one GTM account per business, even if you have numerous sites, so this is usually the name of your business or company. Under the exact same area, you will be asked to choose your nation.
The next action will be to establish and set up a container and tags on your site. There are a couple of various methods you can do this, and we’ll stroll you through 2 simple methods listed below.
Get Material Delivered Straight to Your Inbox
Sign up for our blog site and get excellent content similar to this provided straight to your inbox.
Action 2: Set Up Google Tag Supervisor Code On Your Website (2 Techniques)
Before you can set up GTM on your website, you’ll require to end up establishing your account by producing a container. The container is the piece of code you contribute to your website to make Google Tag Supervisor work. You usually develop a special container for each site you set up GTM on, so when you get to the next area in the account setup circulation, where you enter your “Container Call,” you’ll usually select your website name or URL.
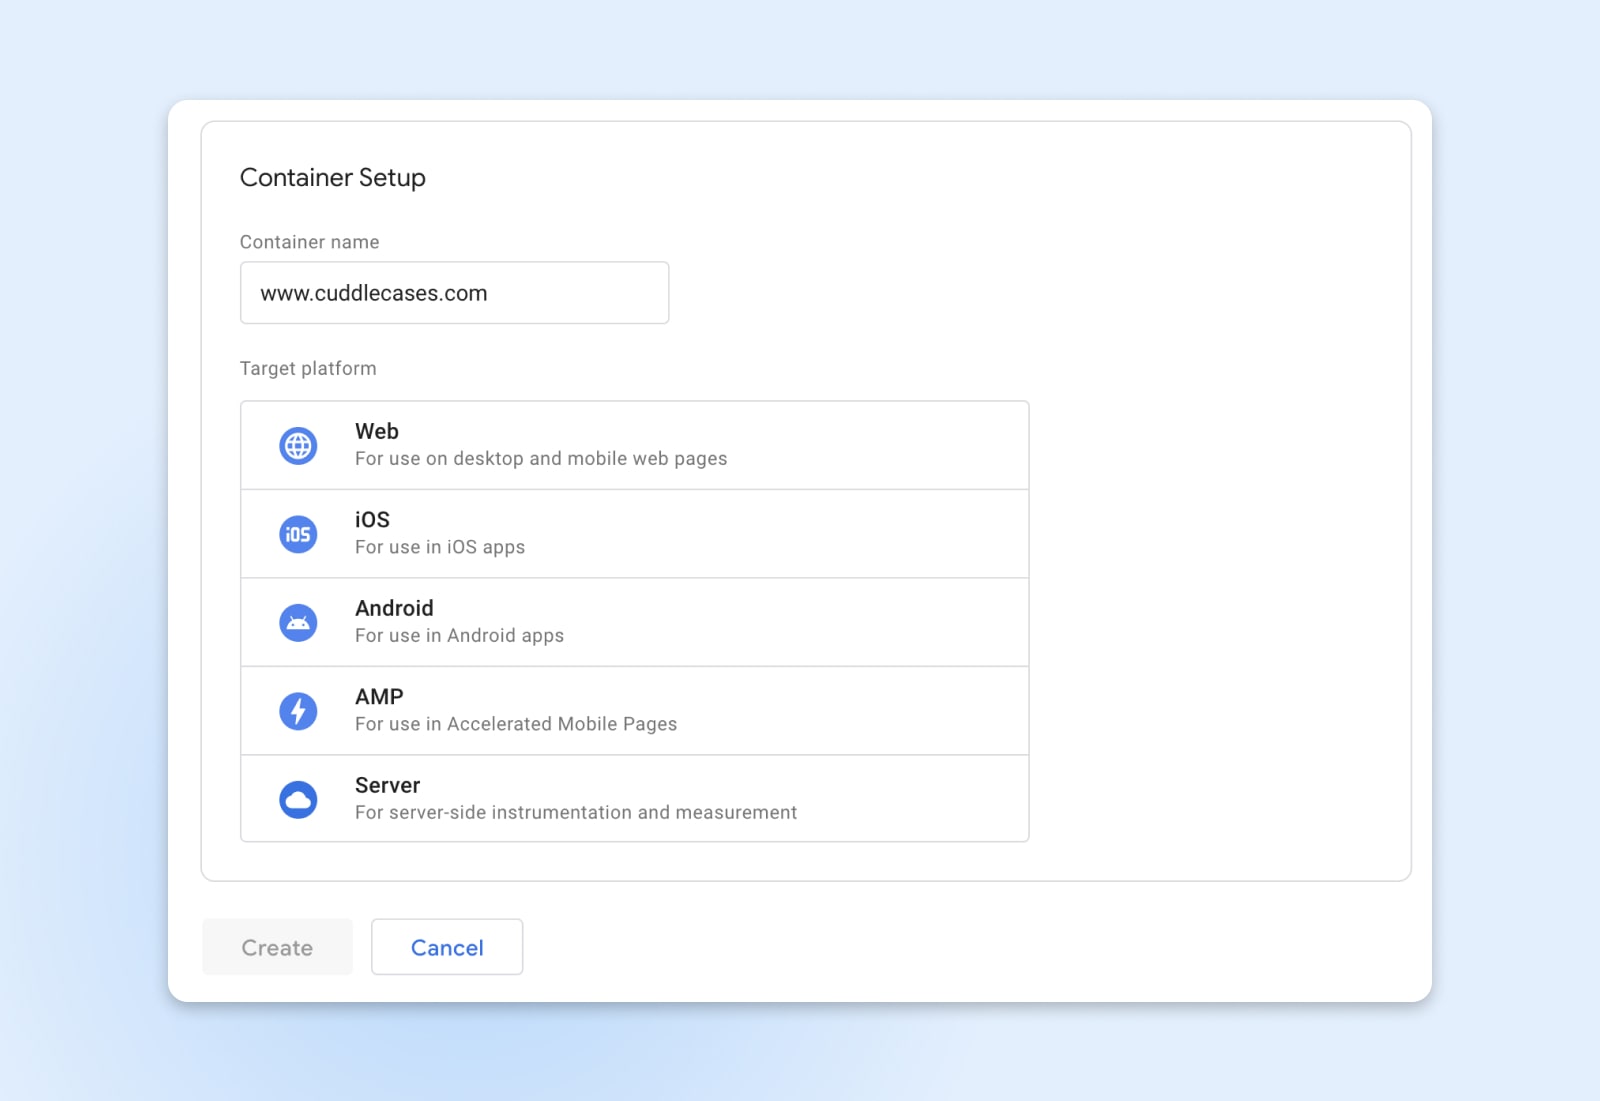
Next, you’ll choose your “Target Platform.” For sites, select “Web.”
Lastly, click “Develop.” This will settle your account and develop your very first container. You’ll see 2 pop-ups:
- The very first one is the Google regards to service. Examine package at the bottom of the page and click “Yes” on top right corner to accept them.
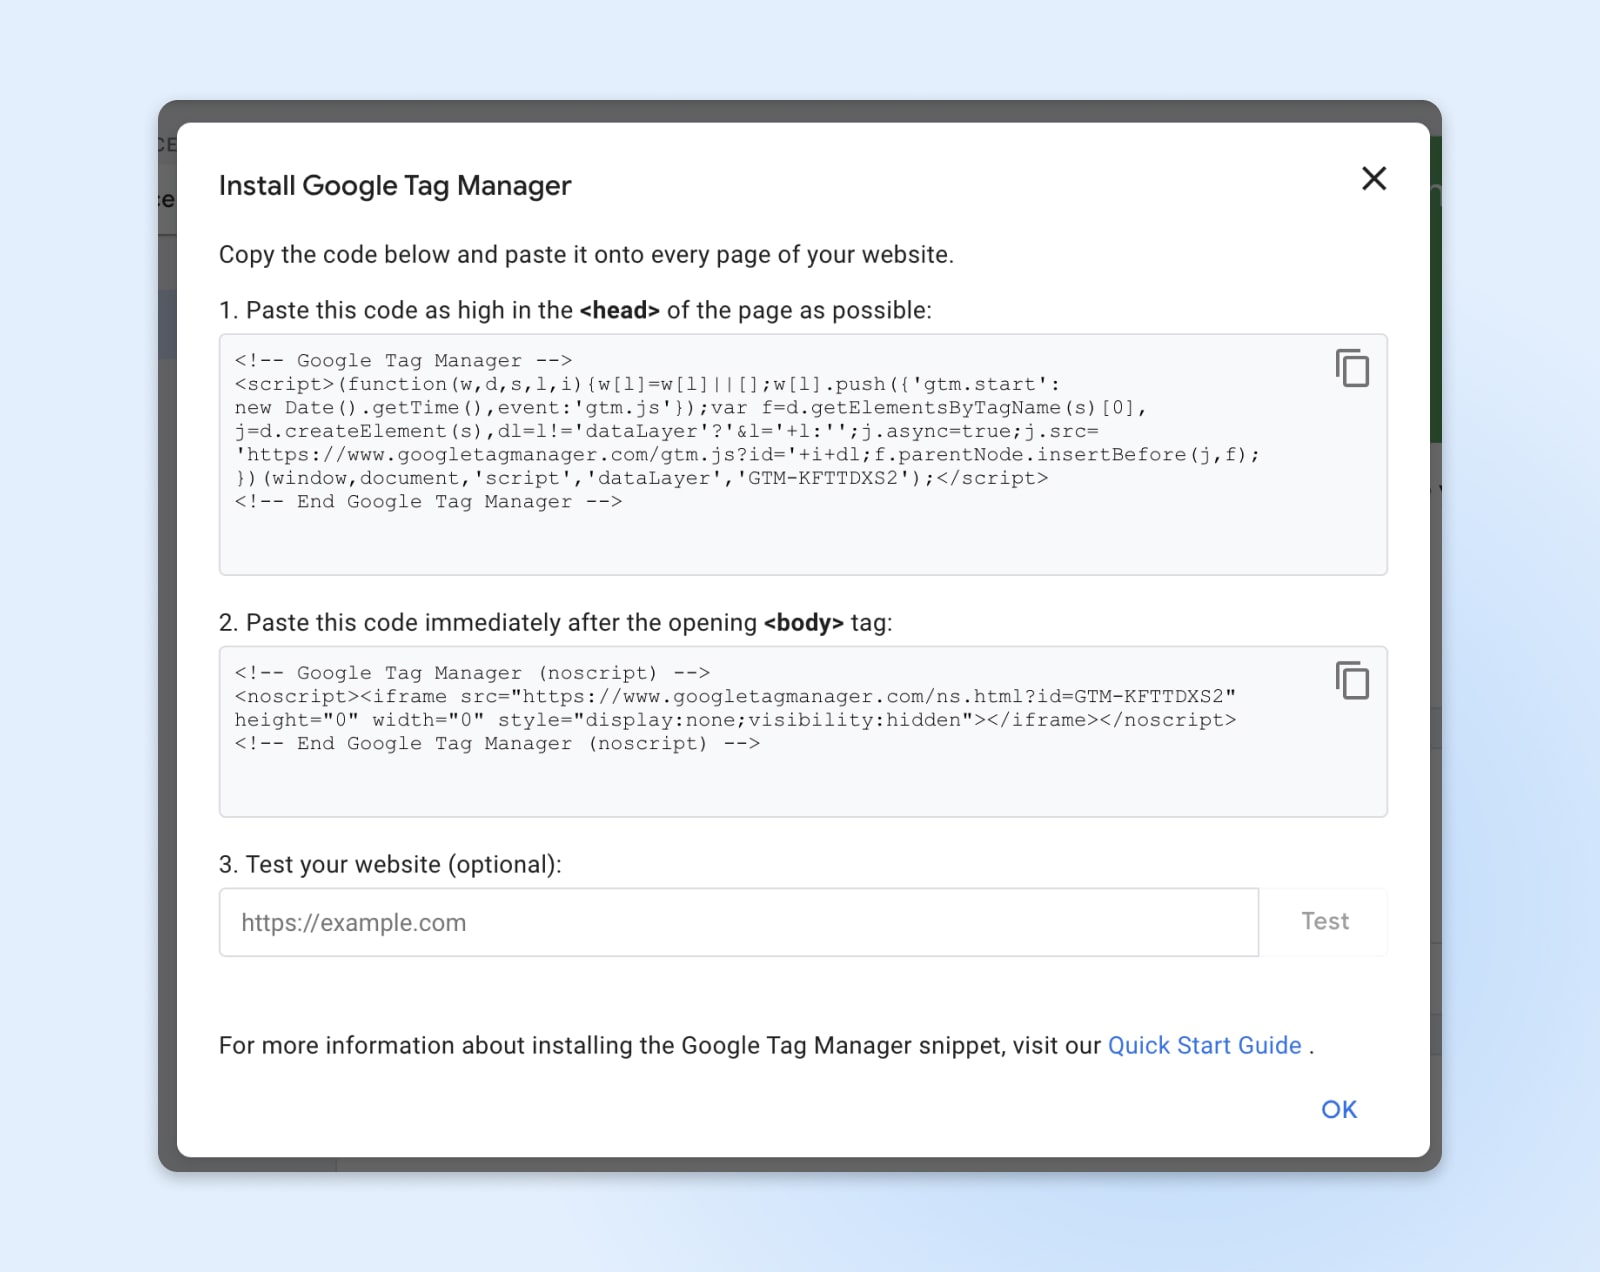
- The 2nd one is a how-to guide, that includes the code bits you’ll require to install your container on your WordPress website. It likewise discusses where to copy and paste the container code, however more on this listed below.
# 1: By Hand Include GTM Code
To include the container to your WordPress website by hand, you’ll require to copy those pieces of code from the pop-up and paste them into your site’s source code.
Here’s what to do:
Log into your WordPress account. What you do next will differ depending upon the variation of WordPress you utilize, your hosting business, and your style, however you require to discover the source code for your style files.
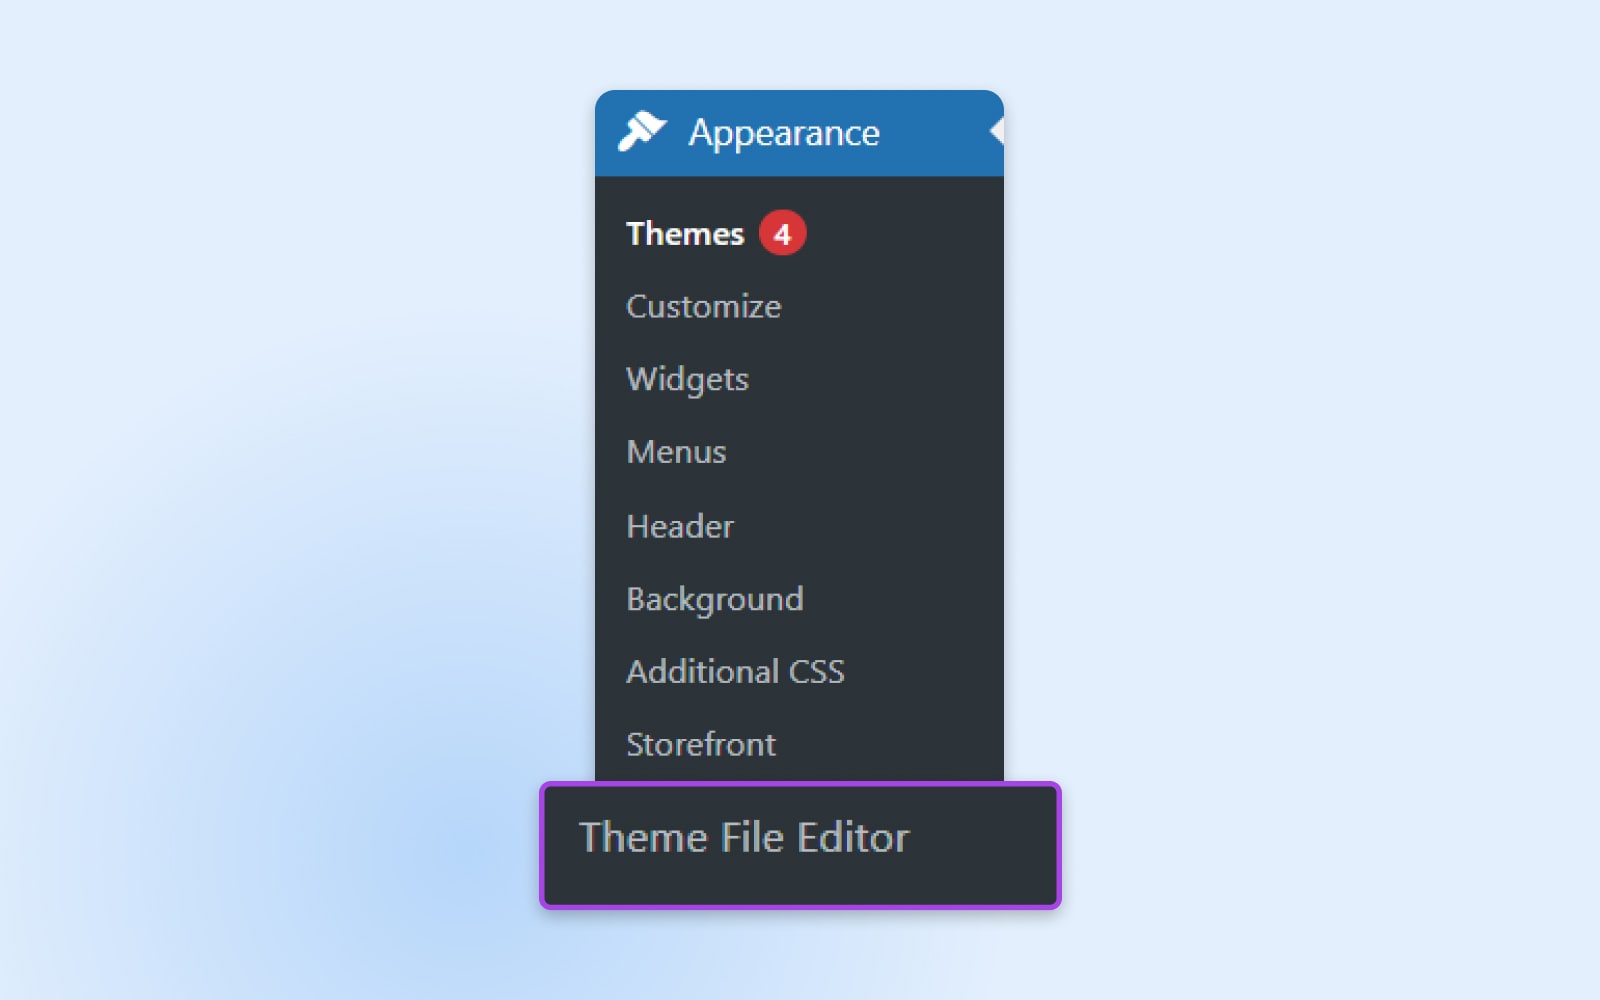
The navigation bar on the right is an excellent location to begin. Search for “Style File Editor” either under Looks or Tools. If you can’t discover the source code, avoid to Alternative # 2, which is a lot easier for newbies.
Style Editor
The WordPress style editor is a full-screen editor that allows you to modify a style’s files straight from the admin control panel. You can utilize the editor to publish brand-new files and get rid of any undesirable ones.
Considering that WordPress styles differ in style and performance, their style code might differ, too. You’re trying to find the declare the header. A typical name for it is header.php If you can’t discover it, call your style designer for assistance.
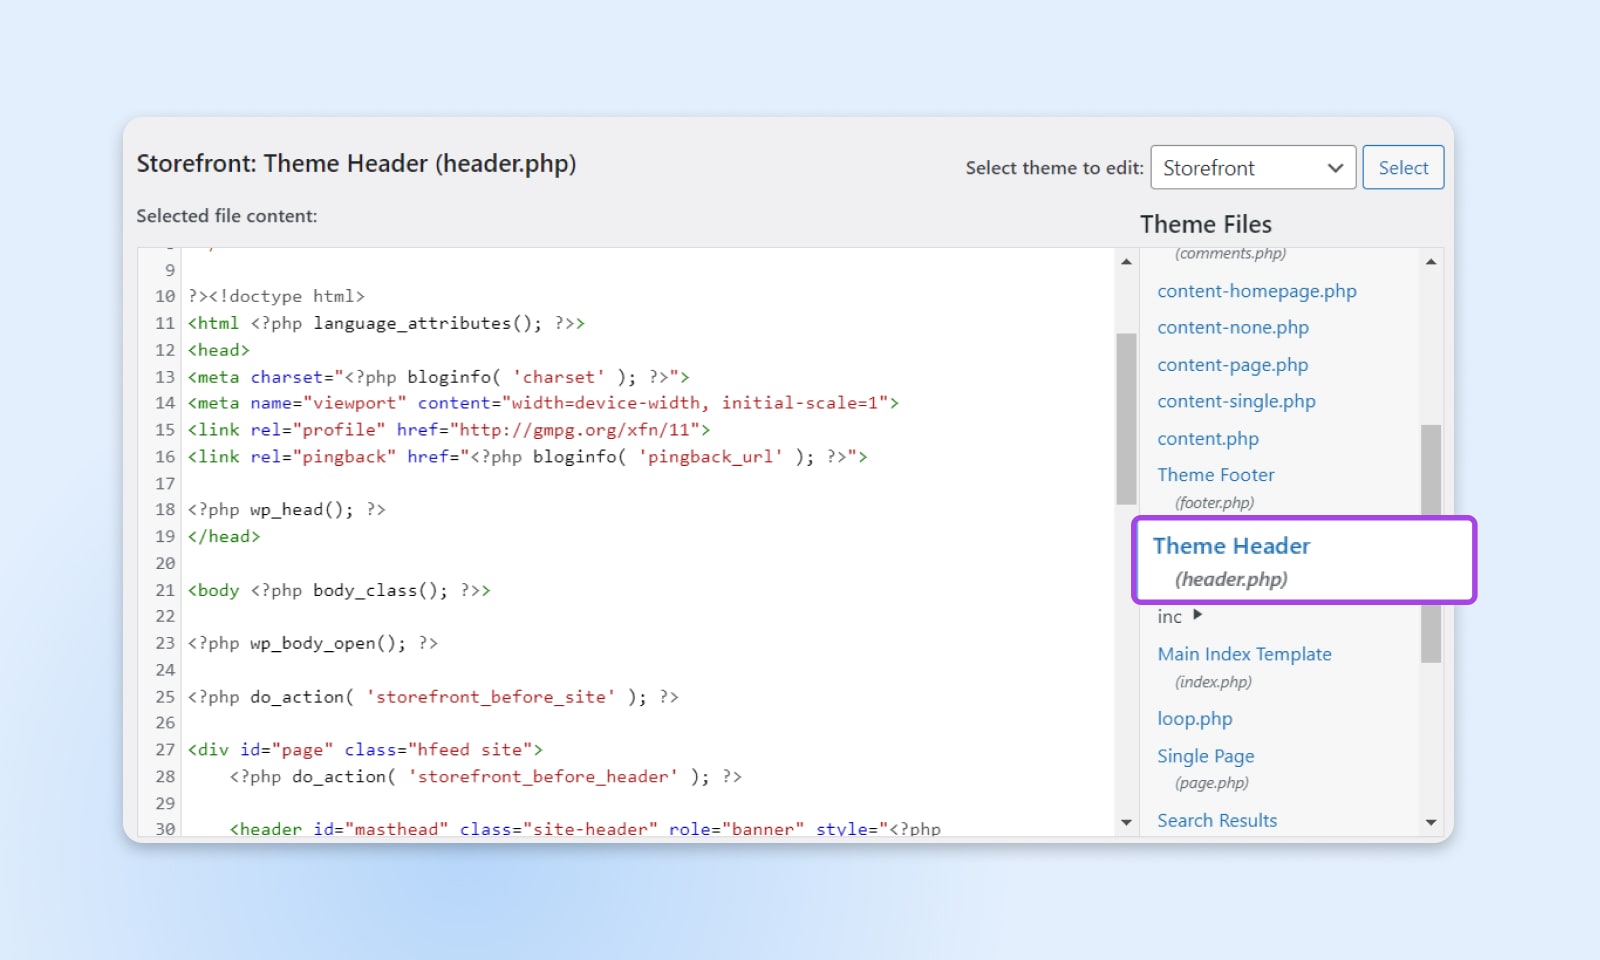
Inside the header file, discover the << head>> and < tags. Copy the very first code bit for your container and paste it as high up in the << head>> area as possible.
Next, discover the << body>> tag. Copy the 2nd code bit for your container and paste it right after the opening << body>> tag.
Click "Update File" to conserve your modifications.
Return to GTM and click "Sneak peek". This will open a brand-new window to link Google Tag Assistant to your site. Enter your website URL and click "Link".
A brand-new window to your website will open, and Google Tag Assistant will inform you if the connection achieves success. Once it's linked, click "End up", return to the previous window, and click "Continue". You ought to see "Google Container Found" at the top of the screen, which suggests that setup of GTM on your WordPress website is total.
Click the "Send" button. Get in the variation name and click "Release".
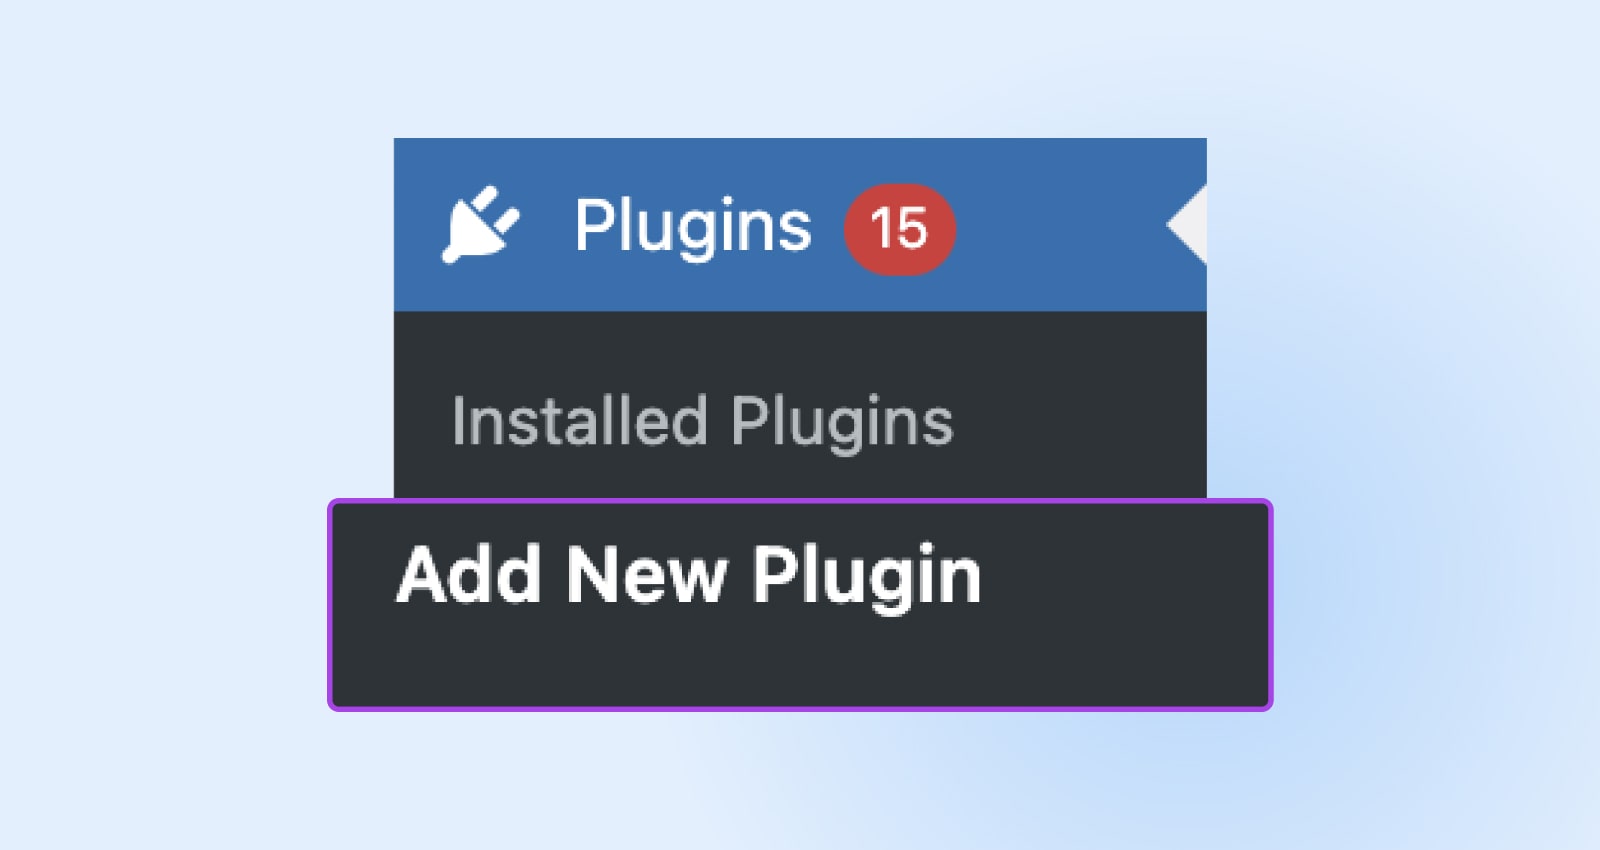
# 2: Usage A Plugin To Set Up GTM
The 2nd approach for setting up GTM on a WordPress website is utilizing a plugin. This approach does not need you to modify your website's source code, so it might be preferable for newbies.
An easy, complimentary plugin to utilize for this is Insert Headers And Footers After producing your GTM account and establishing your container, here's what to do:
Go to your WordPress admin page. Browse to "Plugins", then "Include brand-new", and look for "Set up Headers and Footers." As soon as you discover it, click "Set up Now."
Go to "Settings", then "Place Headers and Footers".
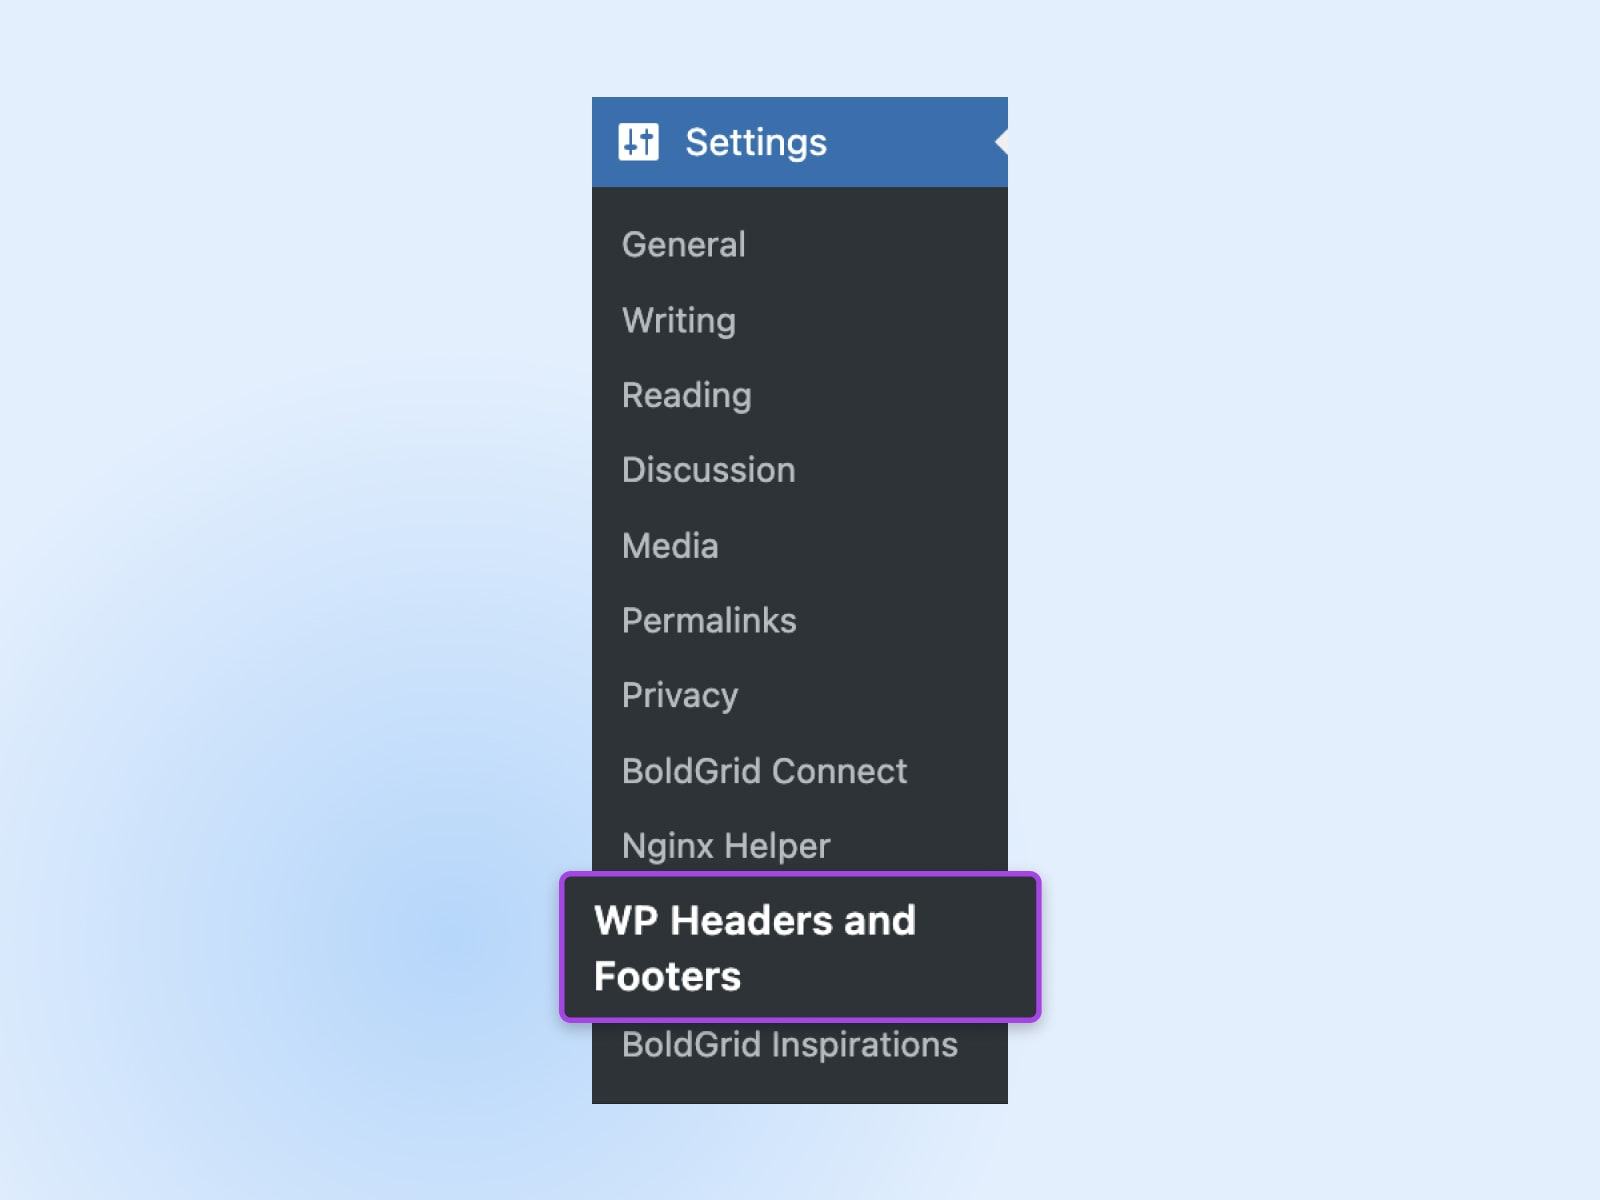
Copy the code bits from packages in your GTM account and paste them into the matching boxes in "Insert Headers and Footers".
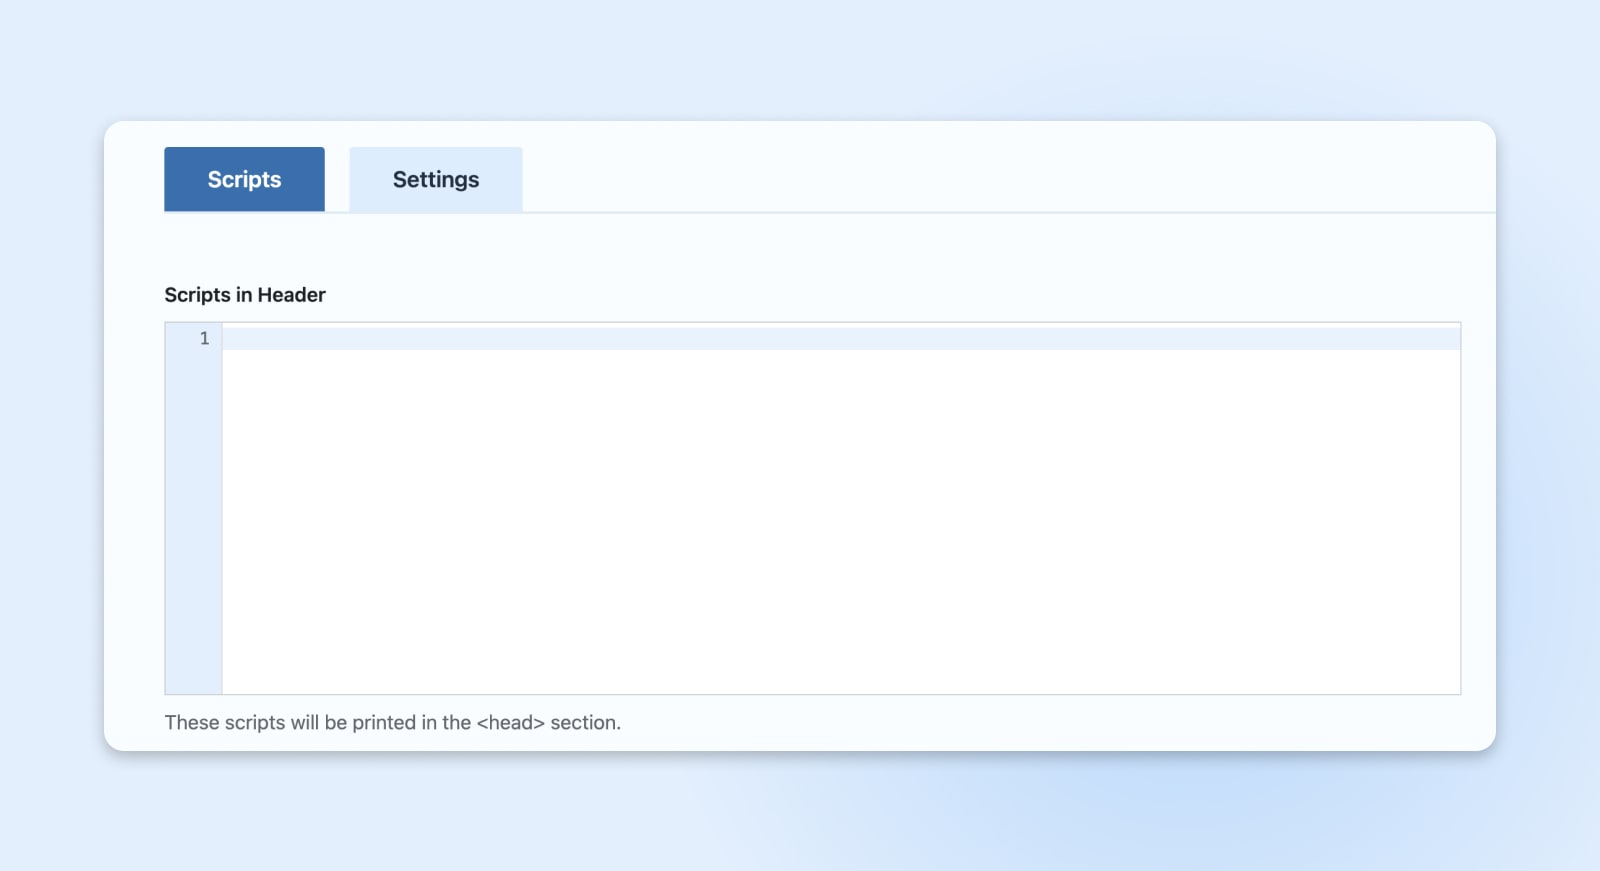
Click "Conserve".
Action 3: Include A Tag
With Google Tag Supervisor code set up on your website, you're now prepared to begin including tags. Tags can be utilized for a range of functions, from tracking site analytics to remarketing and conversion tracking. Here's how to include your very first tag:
Go to the Google Tag Supervisor control panel ( https://tagmanager.google.com/ and choose the Container Call you simply developed.
Click the "Include a brand-new tag" button.

If you're simply beginning, you may wish to develop a Google Analytics tracking tag. This is among the most typical methods to utilize GTM, and GA4 offers lots of methods to utilize tags to track real-time website information and metrics. For a GA4 tag, name it something detailed like, "GA4" or "GA4 Setup."
In the Tag Setup box, choose "Google Tag" In the Tag ID field, enter your Google tag ID. Click "Conserve".
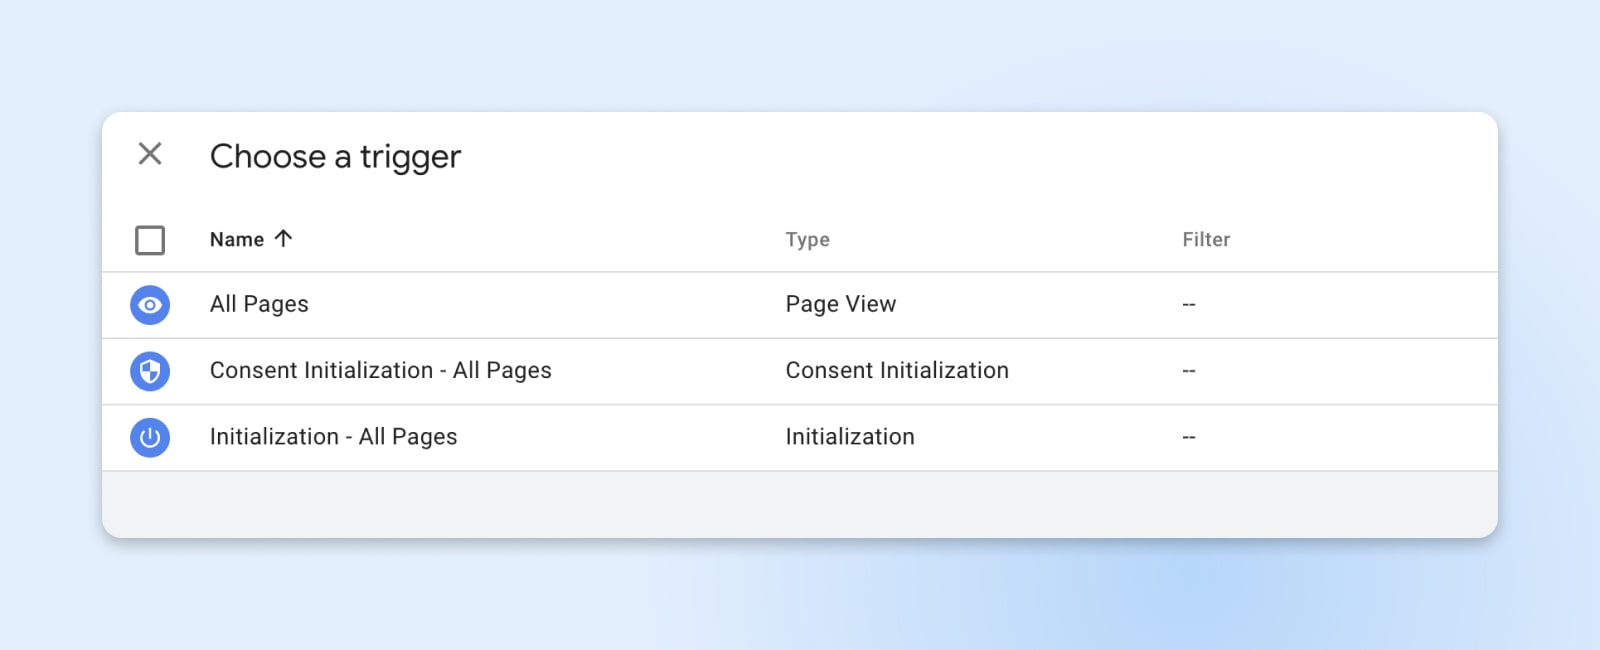
After configuring your tag, you require to specify when it will fire. Click the "Triggering" area and select a trigger. For instance, to track all page views, you'll choose the "All Pages" trigger. Triggers can be as broad or as particular as you desire-- GTM offers you a great deal of control.
Action 4: Confirm GTM Is Installed & & Sending Data
Before you conserve and release your tags, it's important to make sure whatever is working properly. Here's how you can validate that GTM is set up effectively and the tags are sending out information:
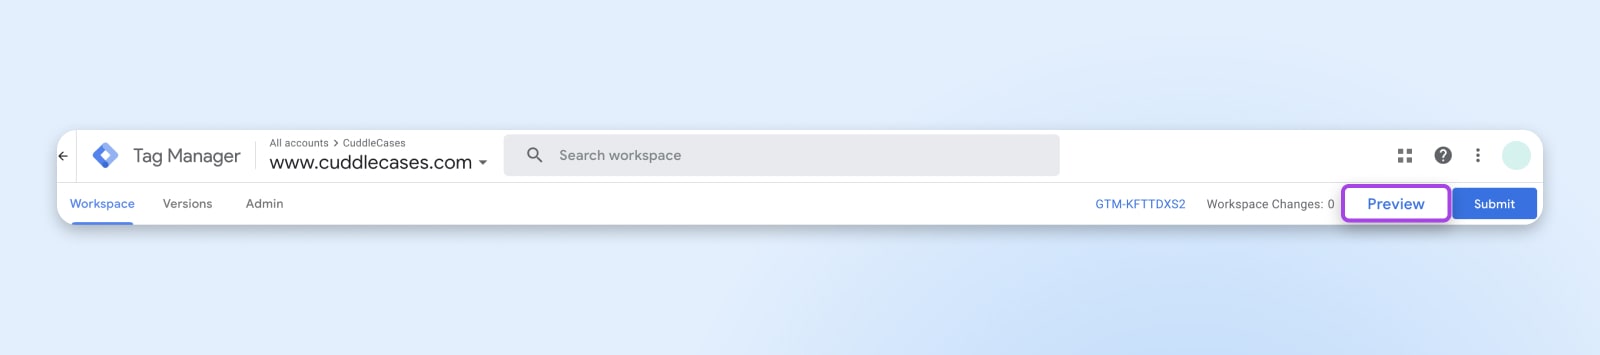
GTM uses an integrated Sneak peek mode that lets you see which tags are shooting on your site. Click "Sneak peek" on the GTM control panel for your site, enter your site's URL, and after that browse to your website. You will see a debug window at the bottom of your website that reveals which tags are shooting and which are not.
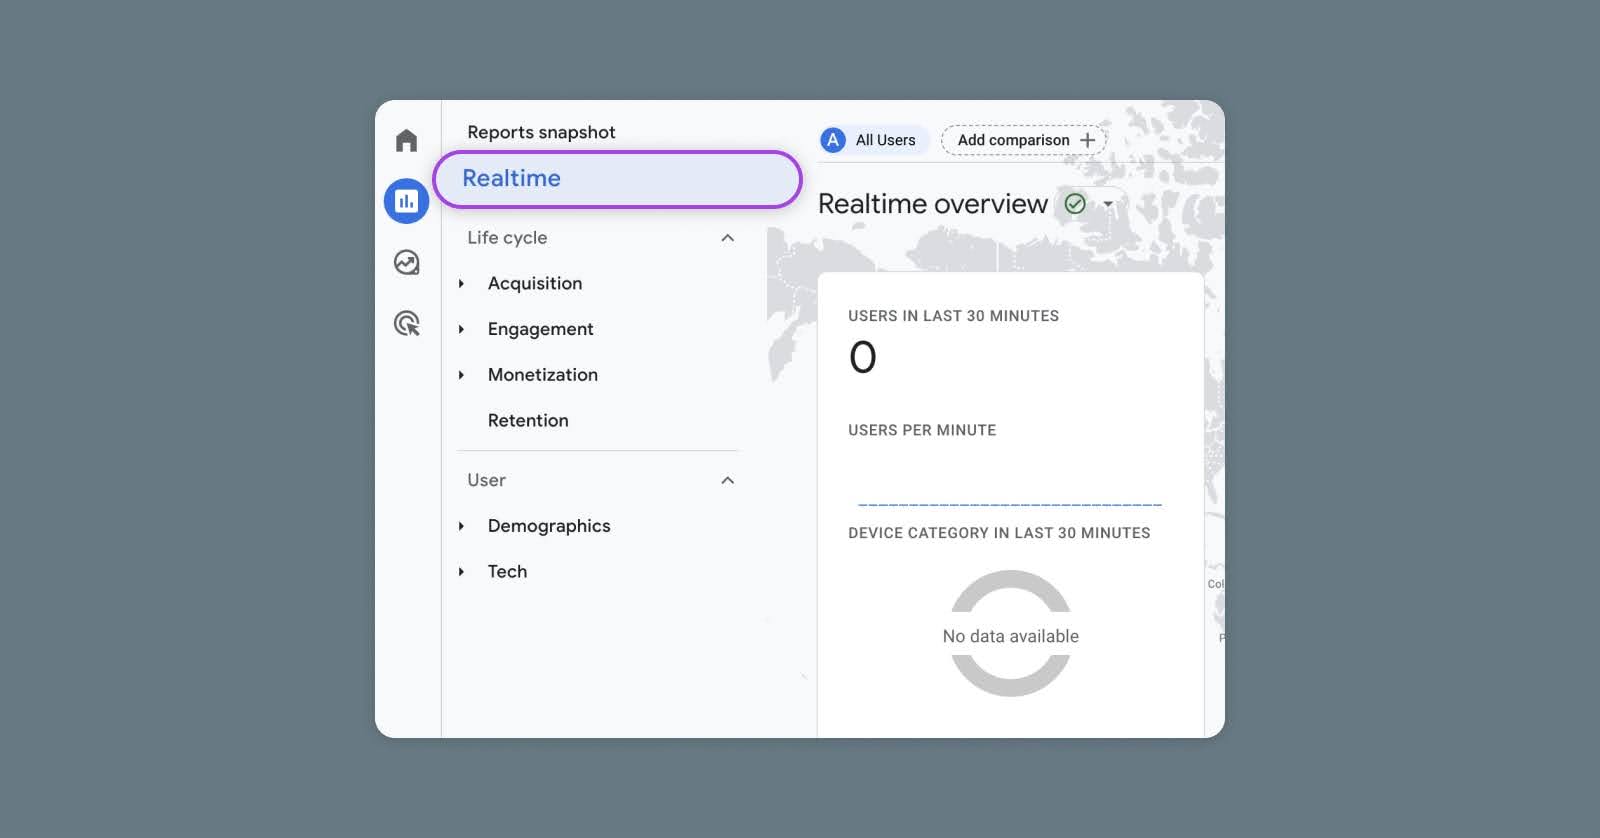
Next, you can try to find real-time information in Google Analytics If you have actually established a Google Analytics tag in GTM, go to your Google Analytics account and browse to the Realtime report. If you see active users on your website (you might require to browse around your website to create information), this suggests that GTM is properly sending out information to Google Analytics.
For a more technical check, you can utilize your web browser's designer tools to check the network demands being made when a page on your website loads. Search for network contacts us to 'google-analytics. com' or other appropriate domains, which can verify that tags are shooting.
By taking these actions, you'll have the ability to with confidence verify that Google Tag Supervisor is set up properly which your tags are gathering and sending out information as anticipated. If there are any problems, the info supplied by these confirmation techniques can likewise assist you repair any issues.
Often Asked Concerns
Can I set up Google Tag Supervisor on various type of websites?
Yes, Google Tag Supervisor can be set up on all kinds of sites, consisting of those constructed with HTML, PHP, WordPress, Shopify, and other content management systems or e-commerce platforms.
Can I utilize a plugin for my CMS to set up Google Tag Supervisor?
Definitely. Lots of content management systems, like WordPress, have plugins readily available that make incorporating Google Tag Supervisor much easier. Simply look for GTM plugins within your CMS's plugin repository.
Where does the Google Tag Supervisor code go on my site?
The Google Tag Supervisor code bit includes 2 parts. The very first part needs to be put as near the opening << head>> tag as possible on every page, and the 2nd part needs to be right away after the opening << body>> tag.
What's the distinction in between Google Analytics and Google Tag Supervisor?
Google Analytics is a tool that gathers and reports information about site traffic and user interactions. Google Tag Supervisor, on the other hand, is a tag management system that enables you to quickly upgrade and handle marketing tags (consisting of Google Analytics tracking code) without altering the code on your site. Basically, Google Analytics determines your website's efficiency, while Google Tag Supervisor assists you enhance the procedure of releasing and handling the tags that gather the information.
Get More Visitors, Grow Your Service
Our marketer will assist you make more traffic and transform more site visitors so you can concentrate on running your service.